
Home »
Preventing Valve Leakage in High-Pressure Systems
Table of Contents
- Why Valve Leakage Matters in High-Pressure Systems
- Select the Right Valve for Your Operating Pressure
- Proper Installation and Commissioning Practices
- High-Pressure Valve Maintenance Checklist
- Valve Seat Leakage Troubleshooting and Diagnosis
- Valve Stem Packing Leak Repair and Adjustment
- Valve Leak Testing Methods and Acceptance Criteria
- When to Repair, Replace, or Upgrade Your Valve
- Frequently Asked Questions
Last Updated: October 7, 2026
Why Valve Leakage Matters in High-Pressure Systems
Preventing valve leakage in high-pressure systems is critical to avoiding operational costs and safety risks. A valve that fails to seal loses pressurized fluid, reduces system efficiency, and risks equipment damage or personnel injury. Uncontrolled leakage also forces compressors or pumps to run longer, driving up energy bills and triggering unplanned downtime.
Fugitive emissions from leaking valves are also a compliance concern. In regulated industries like oil and gas, chemical production, and water treatment, even small leaks can trigger reporting requirements. Preventing valve leakage upfront always costs less than managing a failure in the field.
The good news: most valve leakage is preventable. The problem isn’t that valves inherently leak, it’s that teams skip the steps that stop leaks from starting. Proper selection, installation, maintenance, and testing catch problems before they become expensive failures.
Valve leakage isn’t random. It stems from predictable causes, wrong valve choice, poor installation, inadequate maintenance, or overpressure. Each has a specific fix.
Select the Right Valve for Your Operating Pressure
Choosing the wrong valve is the fastest way to guarantee leakage. A valve rated for 500 PSI will fail at 3000 PSI, and a ball valve designed for water won’t hold up in a hydrogen-production system.
Define your system’s actual operating pressure, not the theoretical maximum, by measuring it under normal running conditions. Then add a safety margin: select a valve rated for at least 1.5 times your peak operating pressure.
Valve type matters too. A ball valve offers tight shutoff for on-off service in high-pressure systems. A check valve prevents backflow but must be sized correctly, since undersizing creates excessive pressure drop and premature wear.
Consider the fluid as well. Corrosive chemicals, abrasive slurries, or extreme temperatures demand specific materials and sealing surfaces, and a valve that seals perfectly on clean water may fail within weeks on a corrosive process fluid. Consult the manufacturer’s compatibility chart before specifying.
Always verify the valve’s rated pressure at the maximum fluid temperature you’ll encounter. Pressure ratings drop as temperature rises. A valve rated 3000 PSI at 70°F may only handle 2500 PSI at 150°F.
Proper Installation and Commissioning Practices
Installation mistakes cause more valve failures than design flaws. A valve selected correctly can still leak if installed wrong.
Start with pipe preparation. Clean the inside of all piping before connecting the valve. Debris, rust, welding scale, thread tape fragments, lodges in the valve seat or seal, causing immediate leakage.
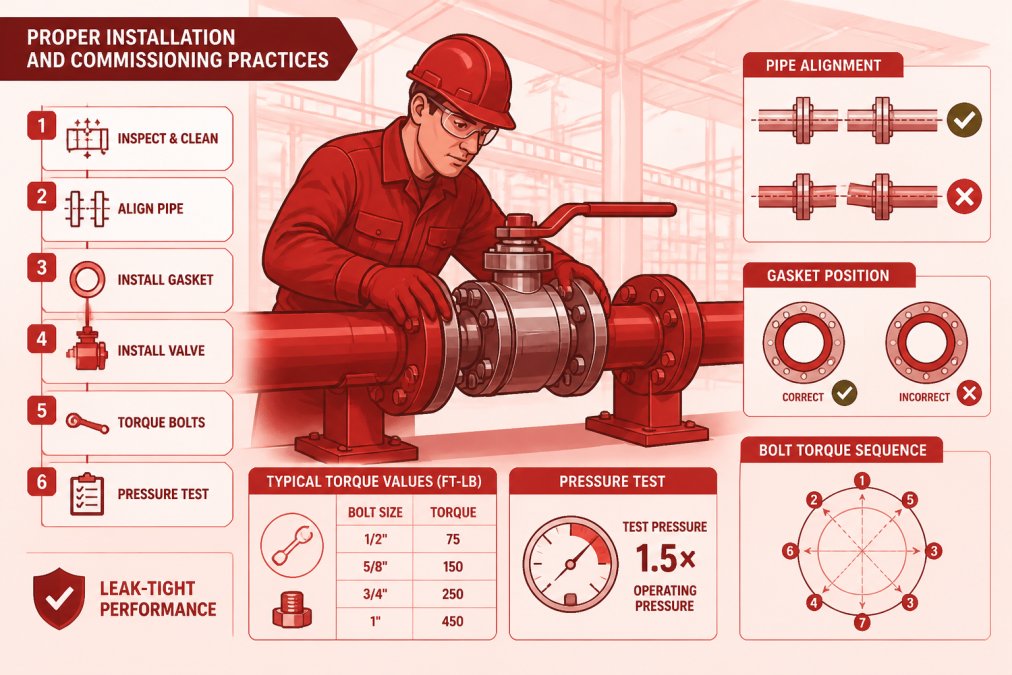
Thread connections must be sealed properly. Use thread-seal tape or pipe dope rated for your operating pressure, wrapping tape clockwise around the male threads three to four times.
Flanged connections demand equal care. Install a gasket rated for your pressure and fluid type.
After installation, commission carefully. Pressurize slowly and open isolation valves gradually to avoid pressure shock, watching and listening for leaks at every joint.
High-Pressure Valve Maintenance Checklist
Preventive maintenance stops most leaks before they start. A structured checklist ensures nothing gets missed.
Routine Inspection (Monthly or per operating schedule):
- Check all valve connections for visible moisture or fluid residue
- Feel the valve body for unusual temperature (indicates internal leakage or excessive friction)
- Listen for hissing or whistling sounds (sign of backflow or pressure relief)
- Verify pressure gauges are reading as expected
- Inspect stem packing for weeping, a few drops per hour is normal; steady dripping is not Persistent issues with stem packing often indicate broader system instability that requires comprehensive pressure tank maintenance to ensure long-term operational integrity.
Lubrication and Adjustment (Quarterly or per duty):
- Lubricate valve stems and actuators per manufacturer guidance
- Adjust stem packing if weeping increases (see stem packing repair section below)
- Check actuator response time, slow actuation suggests friction or wear
- Verify all fasteners remain tight
Deep Inspection (Annually or after high-cycle operation):
- Remove and inspect the valve seat and ball (or poppet) for scoring, corrosion, or deposits
- Replace gaskets and seals if any show wear or hardening
- Test the valve’s shutoff under full operating pressure
- Document findings and plan replacements if degradation is evident
According to Valve Maintenance Best Practices to Prevent Costly Downtime in Your Facility, adjusting lubrication frequency to valve duty and environment, alongside calibration and actuator checks, is essential for reliability. More frequent lubrication is necessary for high-cycle or harsh-environment valves, but avoid over-lubrication, which can trap contaminants and degrade seals.
Never lubricate a valve while it is under pressure. Depressurize the system first. Pressurized lubrication can force grease into seals and cause premature failure.
Valve Seat Leakage Troubleshooting and Diagnosis
Valve seat leakage, fluid flowing past the ball or poppet when the valve is closed, is the most common failure when preventing valve leakage in high pressure systems.
Symptom: Steady drip from the downstream side when valve is closed
Start with pressure testing. Close the valve and monitor downstream pressure for 5 minutes.
Root Cause 1: Debris on the Seat
Particles trapped between the ball and seat prevent full closure, most often immediately after installation or after a pressure surge that dislodges scale.
Fix: Depressurize, open the valve fully, and flush high-velocity clean fluid backward through the valve to dislodge debris. Pressurize and retest. If leakage stops, the problem was debris.
Root Cause 2: Seat Erosion or Corrosion
Corrosive process fluids or high-velocity flow can etch the seat surface, preventing a tight seal. This develops gradually over weeks or months.
Fix: The valve must be replaced. Seat erosion cannot be repaired in the field. Plan the replacement during your next scheduled maintenance window.
Root Cause 3: Overpressure
Pressure spikes above the valve’s rating can warp the ball or seat, destroying the seal. Research from Optimization of Pressure Management in Water Distribution Networks demonstrates that installing pressure-reducing valves in over-pressured systems is an effective way to control leakage and protect downstream equipment.
Fix: Install a pressure-relief valve or pressure-reducing valve upstream. This prevents future overpressure events and protects the sealing surfaces.
Valve Stem Packing Leak Repair and Adjustment
Stem packing leakage, fluid weeping from around the valve handle, is the second most common leak point, and it’s often fixable without replacing the valve.
The packing is a compressible material (usually PTFE or graphite-impregnated) that seals the gap between stem and valve body.
Step 1: Identify the Packing Nut
Locate the hexagonal nut at the base of the valve handle. This is the packing nut. It compresses the packing material below it.
Step 2: Tighten Gradually
Using a wrench, turn the packing nut clockwise by one-quarter turn. Retest for leakage. If weeping continues, wait 30 minutes (the packing needs time to compress), then turn another quarter turn.
Repeat this process, quarter-turn increments, 30-minute waits, until leakage stops. Do not over-tighten. Excessive tightening makes the stem difficult to operate and can damage the packing.
Research published in ScienceDirect case study of a ball valve failing to seal after packing adjustment found that adjusting stem packing could mitigate three of seven factors that caused valve stem leakage during testing.
Step 3: Replace Packing if Tightening Fails
If tightening does not stop leakage after 4-5 quarter-turn increments, depressurize the system and replace the packing:
- Remove the packing nut completely
- Use a packing removal tool (a thin, flat screwdriver works) to pry out the old packing material
- Clean the packing cavity with a dry cloth
- Install new packing material, wrapping it around the stem in layers
- Reinstall the packing nut and tighten snugly (not hard)
- Pressurize and retest
Valve Leak Testing Methods and Acceptance Criteria
Testing confirms your valve seals properly under operating conditions. For high-pressure systems, a leak test is mandatory, not optional.
Bubble Test (Low-Pressure Verification)
For systems under 100 PSI, a bubble test gives quick confirmation: close the valve, apply pressure downstream, and apply soapy water to all connections. Bubbles indicate leakage. It’s fast and cheap but not precise.
Pressure Hold Test (High-Pressure Confirmation)
This is the standard for high-pressure systems. Close the valve under full operating pressure. Monitor downstream pressure for 10 minutes. Acceptance criteria depend on application:
- Tight shutoff (critical service): Zero pressure rise over 10 minutes
- Acceptable leakage (general industrial): No more than 0.5 PSI drop per minute
- Process tolerance: Consult your system design specification
Record the result: initial pressure, pressure after 10 minutes, and pass or fail. This proves compliance and reveals trends, since a valve that passes today but fails next quarter is due for replacement.
Helium Leak Detection (Precision Testing)
For systems requiring extreme precision or for detecting very small leaks, helium leak detection uses a mass spectrometer to measure leak rate in units of standard cubic centimeters per second (sccm).
According to Researchers publishing in Sustainability on pressure management for leakage reduction, a pressure-management study reported optimizing pressure at 30.83% of network nodes and minimizing leakages at 31.65% of nodes.
Pressure hold testing is best for most industrial applications. It’s simple, requires no special equipment beyond a pressure gauge, and delivers reliable results for routine acceptance.
When to Repair, Replace, or Upgrade Your Valve
Not every leak justifies a full valve replacement. The decision depends on leak severity, valve age, and downtime cost.
Repair (If Leakage is Minor and Recent)
If a valve has leaked for less than a week at a low rate (a few drops per hour from stem packing), repair is worth trying.
Replace (If Leakage is Persistent or the Valve is Old)
If tightening the packing nut does not stop stem leakage, or if seat leakage develops, replacement is the practical choice.
Upgrade (If Failures Are Recurring or Conditions Have Changed)
When replacing a valve, consider upgrading to a higher-pressure or higher-performance model.
At Valtorc International, we help facilities assess whether repair or replacement makes sense.
Preventing valve leakage in high-pressure systems is a discipline, not a guessing game. It starts with the right valve choice, continues through careful installation, and depends on consistent maintenance and testing.
Frequently Asked Questions
What are the most common causes of valve leakage in high-pressure systems?
Valve leakage in high-pressure systems stems from several sources: worn or damaged valve seats, improper stem packing adjustment, corrosion or erosion of sealing surfaces, overpressure exceeding the valve’s design limits, and installation misalignment. A 2021 case study found that stem-packing adjustment could address only three of seven identified leakage factors, meaning multiple causes often contribute. Pressure-relief valves can fail if spring tension weakens or if backflow occurs without proper check-valve sealing. Identifying which component is leaking, seat, stem, or body, is the first step toward effective repair.
Can tightening a valve packing stop a leak around the stem?
Tightening stem packing can reduce or stop leakage around the valve stem, but it is not a complete solution for all leakage. Research shows that packing adjustment mitigates only three of seven common leakage factors. Over-tightening can increase friction, damage the packing material, and create operational problems. The correct approach is to adjust packing gradually while monitoring for leakage and stem resistance. If tightening does not stop the leak, the packing material itself may be worn and require replacement. Maintenance guidance recommends checking packing condition during routine inspections and replacing it as part of preventive maintenance for high-cycle or harsh-environment valves.
How often should high-pressure valves be inspected?
Inspection frequency depends on valve duty, operating pressure, and environment. High-cycle valves or those in harsh conditions require more frequent lubrication and inspection than standard-duty applications. A 2026 maintenance guide recommends tailoring lubrication frequency to actual duty and environmental conditions, alongside regular checks of calibration and actuator response. For critical high-pressure systems, visual inspection for external leakage should occur monthly, with comprehensive seal and seat inspection annually or after any pressure excursion. Pressure-relief valves should be tested at least annually to confirm spring tension and sealing integrity. Document all inspections to identify trends in leakage or performance drift.
What leak rate is acceptable in a high-pressure valve?
Acceptable leak rate depends on application, regulatory requirements, and safety criticality. Most industrial standards define fugitive emissions limits and require zero leakage for critical safety valves and pressure-relief systems. For isolation or control valves, acceptable rates are typically less than 0.5 cc per minute at operating pressure, though some applications demand tighter limits. Pressure management studies show that even small leaks accumulate across a network, with optimization approaches targeting 30-32% reduction in leakage rates through pressure control and valve maintenance. Always verify your specific application’s requirements with equipment manufacturers and relevant standards. Leak testing should be performed during commissioning and after any repair or replacement.

CREDIT APPLICATION
Please fill out our credit application for purchase orders and net terms. Download here

DISTRIBUTORS WANTED
Apply to become an official protected distributor. Click here to fill out our distributor application. (Online Form)

VALVE PRODUCT CATALOG
New! Download our 2018 product overview catalog or call us to request a copy. Click here to download (PDF)


